2D/3D Floor Planner Readme
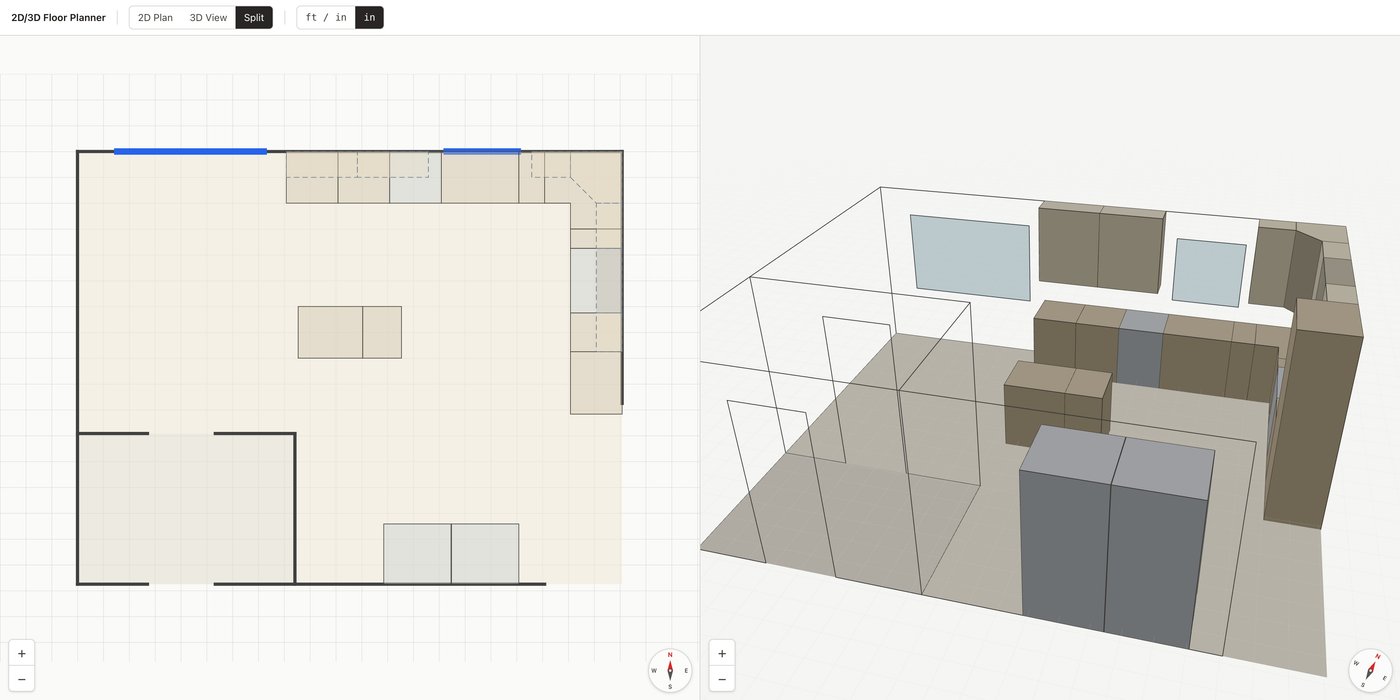
A best-in-class TypeScript boilerplate for designing interior floor plans with matched 2D and 3D views of the same scene — built on React, Three.js, Zustand, and Zod — so you can build at the speed of thought with AI, ship an accurate planner, and rank #1 on Google.
⚡ Demo: 2d-3d-floor-planner.gallop.software
☁️ Cloudflare Demo: 2d-3d-floor-planner-cloudflare.gallop.software
🎨 Template: gallop.software/templates
📦 Repository: github.com/gallop-software/2d-3d-floor-planner
🏷️ Category: 2D/3D Floor Planner Boilerplate
Why Use Gallop Templates?
Just chat with AI inside our Gallop AI Editor using Gallop templates, and you will never want to wrestle with a heavyweight CAD suite, a bloated drag-and-drop room designer, or a proprietary file format again. Simply describe the space you want, and AI writes the code. No SketchUp, no AutoCAD, no visual editors, and no design limitations. Just type and watch. Lay out rooms and walls, place windows, doors, cabinets and appliances, toggle between accurate 2D and 3D views, configure your SEO and AI discoverability instantly, expand endlessly, and get prompting tips from our Gallop community. Go live in minutes.
Features
- 🧱 One typed scene, two views — a single source-of-truth JSON scene drives both the 2D plan and the 3D model, so they can never drift
- 🪚 Cabinet CAD → CNC cut files — a standalone
/cad/workspace turns one typed cabinet definition into a 3D drawing, CNC-ready DXF cut sheets, and GRBL G-code for every board, all derived from the same data - 🧭 Multi-page app — a built-in page menu hops between the Floor Plan and the Cabinet CAD workspace; Vite bundles both pages in one build
- 📐 Precise dimensions — all linear values stored in inches; imperial (
ft / in) display by default with anintoggle - ⚛️ React 18 + TypeScript with strict typing end-to-end
- 🧊 Three.js via
@react-three/fiber+@react-three/dreifor the 3D view - ✏️ Plain SVG 2D floor plan — crisp at any zoom, fully measured
- 🗂️ Edit one file — describe your whole space in
src/design/home.ts; an edge/bounds authoring DSL keeps the math out of your way - 🛡️ Zod-validated scene contract — bad layouts surface as clear errors instead of broken renders
- 🎯 Click-to-select any wall, opening, room, or fixture in either view, with a shared tooltip showing labels and dimensions
- 🧭 Live compass that stays north-up in 2D and tracks the camera in 3D
- 🤖 AI-friendly codebase structure with TypeScript strict mode
- 🔍 SEO and AI optimized with meta tags, Open Graph, and Twitter cards
- ⚡ Vite for instant hot reload and lightning-fast production builds
- 🏠 Starter home included so the project runs out of the box
Cabinet CAD — From Definition to CNC Cut Files
Beyond the floor planner, the template ships a second, standalone page at /cad/ for taking a single cabinet all the way to the shop. Open it from the page menu in the top-left of the toolbar (or visit http://localhost:5173/cad/ directly).
Each cabinet is described once as a typed definition (cad/cabinets/*.ts). From that one source of truth the page generates:
- 🧊 A 3D drawing — every part rendered as its assembled box, with an explode slider, dimension callouts, per-part cut sizes, and a toggleable layer/legend.
- 📄 DXF cut sheets — true finished part outlines nested onto each board (one per material thickness), ready to import into your CAM software. Drag a
.dxfback onto the canvas to inspect it. - ⚙️ GRBL G-code — ready-to-run toolpaths per board for a BobsCNC KL744 (1/4" bit): pockets first while parts are still captive, then outside profiles with holding tabs. Includes a separate wasteboard-surfacing program.
Two build variants ship as worked examples — upper18 (CNC face-frame upper on 48×48 boards) and upper18saw (the same cabinet as straight saw cuts on 4×8 sheets).
Machine-safety audit: because bad G-code breaks bits and gouges stock, every generated job is checked by npm run audit:gcode — it flags un-parseable lines, plunges into stock, travel below safe height, cuts deeper than the material, out-of-bounds moves, and more, and confirms every toolpath lands exactly on the 3D plan.
Getting Started
New to this? No problem. You'll have AI guiding you the entire way.
The Gallop AI Editor
The Gallop AI Editor is a desktop app built specifically for AI-powered web development. It includes everything you need — code editor, AI assistant, Git, terminal, media manager, font manager, SEO & structured data scanner, and a gallery of open-source templates — all in one window with nothing to configure.
It was purpose-built for this workflow, whether you're a complete beginner or an advanced developer who wants AI-assisted iteration:
Available for Mac and Windows.
Step 1: Install Gallop AI Editor
- Go to gallop.software and download the installer for your platform
- Open the installer and follow the prompts
- Launch the Gallop AI Editor
- If prompted, the editor will walk you through installing Node.js automatically — just follow the on-screen steps
Step 2: Create Your Project
Open the New Project modal. It has three tabs — Gallop Templates, Git Repositories, and Local — and you want the first one.
- On the Gallop Templates tab, select 2D/3D Floor Planner from the gallery
- Name your new repository, and pick which GitHub account or organization owns it
- Choose whether it's public or private
- Pick the folder on your computer where it should live
- Click create
The editor then does everything else in one pass:
- Creates your own repository on GitHub from the template — a clean repo that belongs to you, with no shared history tying it back to the original
- Clones it to your machine in the folder you picked, with a progress bar
- Opens it as a project, ready to run
Because the repository is created here, your GitHub repo already exists by the time you reach Put Your Floor Planner Online — there's nothing to set up on GitHub when it's time to deploy.
Why this is one click: you're already signed in to GitHub inside the editor, so it can create the repository on your behalf without asking you for anything.
Step 3: Start Your Planner
Click the play icon in the left rail (or press Cmd+1) to open the Start Website view. It's a terminal with a toolbar across the top — two clicks and your planner is running locally.
- Click Install and wait for it to finish. This downloads everything the project needs, and takes a minute or two the first time.
- Click Start Website. Your planner is now running at http://localhost:5173.
- Click the globe icon in the top-right title bar to open it in a browser. Hover it and it tells you the port it's running on.
The Floor Plan lives at / and the Cabinet CAD workspace at /cad/ — the page menu in the top-left of the toolbar hops between them.
Here's the full toolbar, and the command each button saves you from typing:
The play icon in the left rail turns green with a dot while your planner is running, so you can tell at a glance from any view.
Leave the server running while you work. You only need Start Website once per session — both views refresh on their own every time you or the AI saves a file.
If something looks stuck — a change won't appear, or the page won't load — try Refresh Cache first, and Stop then Start Website if that doesn't do it.
Step 4: Chat with AI
Press Cmd+J to show the AI panel on the right. Click the + in its header and you'll get a picker with three cards:
Both AI options are Claude Code. Gallop's AI Chat runs Claude Code under the hood and puts a friendlier interface on top of it; the Claude Code card gives you the same engine as its normal terminal interface. Same capabilities, same access to your project — pick whichever you find easier to read.
- New to this? Use AI Chat. Answers render as formatted text, file changes are easier to follow, and screenshots insert straight into the conversation.
- Already use Claude Code? Use the Claude Code card. Everything works the way you're used to, including slash commands and your existing habits.
You can run both at once in separate tabs — they're independent sessions.
Pick AI Chat, then just ask:
I'm new to this. Help me turn this template into my own floor plan.
The AI assistant can read and edit your project files, run commands, and explain anything you're confused about. Just describe what you want in plain English:
Replace the starter home with my one-bedroom apartment
Add a kitchen island and a row of base cabinets along the north wall
Move the front door to the south wall and add two 48" windows
Turn the living room into an open-plan living and dining space
Tip: Press Cmd+Shift+S to take a screenshot of your running plan and attach it to the chat. The AI can see exactly what you see and suggest changes visually.
One file is the design. Rooms, walls, windows, doors, cabinets, and appliances all live in src/design/home.ts. Everything else is the template engine — the AI knows to leave it alone, because CLAUDE.md says so.
Working in the Editor
Everything below is how you actually build your floor plan day to day. The left rail switches between views; each has a keyboard shortcut.
Cmd+K cycles forward through views if you'd rather not remember numbers.
The AI Panel
The AI panel lives on the right and is where most of your work happens.
Cmd+Jshows and hides it. Hiding does not stop what's running — a long AI task keeps going while the panel is closed.Cmd+Iexpands it to fill the window, for when you're reading a long answer.Cmd+Topens a new tab;Cmd+Shift+[andCmd+Shift+]cycle between them. You can drag tabs to reorder them.- Every tab has a
×. Close the last one and you're back at the AI Chat / Claude Code / Terminal picker.
Agent mode vs Plan mode — on an AI Chat tab, press Cmd+. to switch between them. (Claude Code tabs have their own mode controls, so Cmd+. doesn't apply there.)
Two AI Chat slash commands are worth knowing: /new starts a fresh conversation, and /compact summarizes a long one so you can keep going without losing the thread.
How you pay for AI is set in the panel's settings gear. There are three options, and none of them require you to have an API key:
Sessions pick up this setting when they start, so change it before opening a chat tab.
Showing AI What You See
Describing a layout problem is hard. Show it instead.
Cmd+Shift+S— drag a box around any part of your running plan. The capture opens in an annotator where you can draw arrows and boxes, then Insert it straight into a chat tab. Screenshots of the 3D view are especially useful: "this cabinet run is too short" reads better than any description.Cmd+Shift+G— opens the code file behind whatever page your browser is showing.Cmd+Shift+L— drops the file you're editing into the chat as a reference, so you can say "fix the spacing here" without explaining where "here" is.
Studio: Images and Fonts
Cmd+4 opens Studio, which manages everything in your public/ folder.
- Drop in images and it generates thumbnails and blur placeholders automatically
- Crop and edit without leaving the editor
- Push assets to a CDN so they load fast worldwide
- Drop in a font and it converts to WOFF2, the format browsers load fastest
Studio keeps its records in _data/_studio.json. That file is generated — let Studio manage it.
SEO
Cmd+5 opens the SEO view. You run a report yourself — the AI can't trigger one for you:
- Type or paste the URL you want to check (your local site works:
http://localhost:5173) - Pick a report from the dropdown
- Click Analyze
Each report opens in its own tab, so you can check several pages side by side.
Once you have the results, hand them to AI: screenshot the report with Cmd+Shift+S and insert it into a chat, or paste the details in. Then ask for what you want:
Here's the SEO report for my floor planner. Fix everything it flags.
Source Control
Cmd+2 gives you Git without the command line — stage individual lines, review diffs side by side, and browse history. If you'd rather not think about Git at all, don't: ask AI to "commit my changes and push them."
Keyboard Shortcuts
On Windows, use Ctrl wherever this says Cmd.
Join the Community
Connect with other Gallop users on Discord or Slack. Share your progress, swap AI prompting tips, and see what people are building with the help of AI.


Put Your Floor Planner Online
Your code is already on GitHub — you're signed in inside the editor, and your repository was created when you started the project. All that's left is a hosting account: either Cloudflare or Vercel. Check their current plans before you pick — pricing and what each tier allows change over time.
Both pages build to plain static files, so there is nothing to configure and no secrets to manage on either host.
The Easy Way: Let AI Deploy It
Press Cmd+6 (the rocket icon) to open the Publish view. It has a tab for each service you might need:
Each tab links straight to the page where you generate the token, with the right permissions preselected — you paste it in, click Connect to verify it, then Save.
From then on the editor injects those credentials into your terminal and AI chat automatically, so the assistant can deploy on your behalf and you never paste a token into a project file.
Important: credentials are handed to a session when it starts. After saving a new token, open a new chat or terminal tab — an existing one won't see it.
Then just ask:
Push my latest changes to GitHub and deploy this floor planner
The AI will walk you through every step. When you're done, your planner will be live with a URL you can share.
Already know which host you want? Use the ready-made prompt for Cloudflare or Vercel.
Deploy to Cloudflare Workers
See it live: 2d-3d-floor-planner-cloudflare.gallop.software — the same template, deployed exactly the way this section describes.
Step 1 — Connect Cloudflare in the Publish view (Cmd+6). Once saved, the editor puts your Cloudflare credentials (CLOUDFLARE_API_TOKEN and CLOUDFLARE_ACCOUNT_ID) into the terminal environment and makes them available to the AI chat. Wrangler reads those variables automatically, which means nobody has to run npx wrangler login, and no token is ever pasted into a file.
Step 2 — Paste this prompt into the AI chat:
Deploy this floor planner to Cloudflare Workers. My Cloudflare account isalready connected, so CLOUDFLARE_API_TOKEN and CLOUDFLARE_ACCOUNT_ID are inthe terminal environment — do not run `wrangler login`.Please:1. Rename the Worker in wrangler.jsonc to match my project, and ask me whatto call it2. The `routes` block in wrangler.jsonc points at the demo's custom domain,which is not on my account — ask me for my own domain, or remove the blockso the Worker gets a workers.dev URL3. Run `npm run cf:deploy` to build both pages and create the Worker4. Tell me the live URL when it's done, including the /cad/ page
There are no secrets and no environment variables to collect, so the whole thing runs unattended. The first deploy takes a couple of minutes.
Step 3 — Follow-up prompts for anything after the first deploy:
Deploy my latest changes to Cloudflare
Rename my Cloudflare Worker to my-house-plan and redeploy
My /cad/ page 404s on Cloudflare — check the asset config in wrangler.jsonc
If a prompt fails, paste the error back into the chat. The most common cause is a Cloudflare account that isn't connected yet, so wrangler has no credentials — the AI can diagnose that from the error text.
Reference: How the Cloudflare Deployment Works
Everything below is reference material for your AI assistant — what files Cloudflare needs and what has to change when you rename things. You don't need to read or run any of it yourself; the prompts above cover the whole process. It's here so the AI has accurate ground truth, and so you have something to point at if a deploy goes wrong.
The floor planner is a static site. npm run build type-checks, then bundles both pages into dist/. Cloudflare serves that folder straight from its edge network — there is no server code, no adapter, and no runtime secrets, which is why this deployment has fewer moving parts than most.
The Files Cloudflare Uses
This template ships Cloudflare-ready. If you forked or generated this repo, every config file already exists — you do not create any of them.
Generated paths, all gitignored, none of them committed: dist/ (the build output that gets uploaded) and .wrangler/ (wrangler's local state and cache). dist/ does not exist until you build, which is why cf:deploy and cf:preview always build first.
The Deployment Sequence
This is what the AI runs on your behalf:
npm run cf:deploy # build + deploy — creates the Worker on first run
That's the entire process. No wrangler login step is needed: connecting Cloudflare in the editor already put CLOUDFLARE_API_TOKEN in the environment, and wrangler picks it up automatically. If your account can't be inferred from the token, CLOUDFLARE_ACCOUNT_ID covers it — the editor sets that too. Working outside the editor? Run npx wrangler login once for OAuth instead; wrangler ships as a dev dependency, so npx runs the local copy with no global install.
Renaming the Worker
wrangler.jsonc ships with the Worker named 2d-3d-floor-planner. Change name to whatever you want the Worker (and its *.workers.dev subdomain) to be called, then redeploy. There is no self-reference binding to keep in sync, unlike adapter-based setups.
The name must match the Worker's actual name in your Cloudflare dashboard. If a Git-connected deploy created it under a different name, update wrangler.jsonc to match.
The Custom Domain
wrangler.jsonc also declares the demo's custom domain:
"routes": [{ "pattern": "2d-3d-floor-planner-cloudflare.gallop.software", "custom_domain": true }]
custom_domain: true means Cloudflare creates and manages the DNS record for that hostname on deploy. This is the one thing you must change — the domain has to be on your Cloudflare account, or the deploy fails. Point it at a hostname you own, or delete the whole routes block to fall back to the free <worker-name>.<your-subdomain>.workers.dev URL.
SPA Fallback and the Two Pages
assets.not_found_handling is set to single-page-application, so any URL that doesn't match a built file serves index.html instead of a bare 404. /cad/ still resolves to its own cad/index.html, because that file really exists in the build.
Git-Connected Builds
If you connect the repo in the Cloudflare dashboard instead of deploying from your machine:
- Build command:
npm run build - Deploy command:
npx wrangler deploy - Environment variables: none — nothing in this template is read from the environment at build or run time.
Custom domains live under the Worker's Settings → Domains & Routes.
Quick Reference
Deploy to Vercel
Prefer Vercel? Connect your Vercel account in the Publish view, then paste this into the AI chat:
Deploy this floor planner to Vercel. My Vercel account is already connected.Please:1. Push my latest changes to GitHub2. Link this project to Vercel and deploy it to production3. Tell me the live URL when it's done
Vercel detects Vite automatically — the build command is npm run build and the output directory is dist. It redeploys every time you push, so from here on your changes go live by asking the AI to push them.
Congratulations! Your floor planner is now live to the world. Share your new URL and start growing your audience. Ready for a custom domain? See Cloudflare's or Vercel's domain setup guide.
About Gallop Templates
2D/3D Floor Planner is part of the Gallop template ecosystem. Gallop templates are designed to be built with AI — just describe what you want in plain English and watch your project come to life.
Gallop AI Editor
The Gallop AI Editor is a desktop code editor built specifically for AI-powered development. It combines a full code editor, Claude AI assistant, visual Git interface, integrated terminal, media manager, and template gallery into one app. Everything is preconfigured to work with Gallop templates out of the box — no extensions, no plugins, no setup.
Key highlights:
- Claude AI built in — Chat with Claude to lay out rooms, place fixtures, and learn the authoring API as you go, with the latest Claude models available out of the box
- Agent and Plan modes — Agent mode lets AI apply changes automatically. Plan mode shows you what AI wants to do before it does it, so you stay in control
- Screenshot capture — Press
Cmd+Shift+Sto screenshot your running plan and share it with AI for visual feedback - Built-in template gallery — Browse the Gallop templates, all free and open source, and start one in a single click: your own GitHub repository created and cloned locally without leaving the editor
- Visual Git — Stage, commit, and merge with a 3-column visual interface. No command line required
- Studio media manager — Manage images, fonts, and assets with thumbnail previews and CDN sync
- Node.js manager — Install and switch Node.js versions without touching the terminal
- Auto-updates — The editor keeps itself up to date automatically
Built for SEO and AI Discoverability
This template was crafted from the ground up to get your project ranked #1 on Google and recommended by AI assistants like ChatGPT and Google's Gemini. The HTML shell ships with complete metadata, Open Graph, and Twitter cards that search engines and AI models actually parse.
AI mentions are becoming more important than traditional SEO. When someone asks an AI assistant for "tools to plan a room layout," you want yours in that answer. Gallop templates are built with the metadata and semantic markup that AI models rely on to understand and recommend your work.
What You Can Build
- Design with AI — Let AI do the technical heavy lifting while you provide creative direction
- Skip the boring work — Let AI place walls, cut openings, and pack cabinet runs while you describe the room
- Accurate everywhere — Inches under the hood with imperial display means measurements stay true across 2D and 3D
- One source of truth — Edit a single typed file and both views update instantly via HMR
- Get found online — SEO foundation with metadata for search engines and AI assistants
- Deploy instantly — Static-build output that drops onto Cloudflare Workers, Vercel, or any static host
Built by Industry Veterans
The team behind Gallop has decades of combined experience building websites, apps, and web applications for top global brands. We've helped projects achieve #1 Google rankings in competitive markets and understand what it takes to ship something polished. That expertise is baked into every template, every component, and every line of code.
Project Structure
2d-3d-floor-planner/├── src/│ ├── main.tsx # React entry — mounts <App> into #root│ ├── App.tsx # Layout shell: Toolbar + 2D / 3D / Split views│ ├── design/│ │ └── home.ts # THE DESIGN — your rooms, walls, openings, fixtures (EDIT THIS)│ ├── scene/ # The template engine (reference it; don't change it)│ │ ├── schema.ts # Zod schema + types — the scene contract│ │ ├── build.ts # Edge/bounds authoring DSL used from home.ts│ │ ├── geometry.ts # Polygon, wall, and opening math│ │ ├── units.ts # Imperial / inch formatting helpers│ │ ├── describe.ts # Shared tooltip + selection text for both views│ │ └── store.ts # Zustand state (view mode, units, selection)│ ├── views/ # The renderers│ │ ├── Plan2D.tsx # SVG 2D floor plan│ │ ├── Scene3D.tsx # react-three-fiber 3D scene + camera│ │ ├── Compass.tsx # Cardinal compass rose│ │ └── three/ # 3D primitives│ │ ├── Wall3D.tsx # Zero-thickness wall plane with openings cut out│ │ ├── Opening3D.tsx # Window / door / cased opening│ │ ├── Floor3D.tsx # Room floor polygon│ │ └── Fixture3D.tsx # Box / cylinder / prism cabinets & appliances│ ├── ui/ # Toolbar chrome│ │ ├── Toolbar.tsx # Top bar (page menu + brand + toggles)│ │ ├── PageMenu.tsx # Dropdown to switch between Floor Plan and Cabinet CAD pages│ │ ├── ViewModeToggle.tsx # 2D Plan / 3D View / Split│ │ ├── UnitsToggle.tsx # ft / in · in│ │ └── ZoomControls.tsx # Shared +/- zoom buttons│ └── styles/│ └── index.css # Tailwind entry + global styles├── cad/ # Standalone Cabinet CAD page (/cad/) — 3D + DXF + G-code│ ├── index.html # SEO-rich HTML shell for the CAD page│ ├── main.ts # CAD app entry — canvas, sheets, downloads, page menu│ ├── model.ts # Cabinet definition types + DXF generation (single source of truth)│ ├── view3d.ts # Three.js 3D drawing of a cabinet (explode, callouts, layers)│ ├── gcode.ts # CAM — generates GRBL G-code per board from the cabinet│ ├── surfacing.ts # Wasteboard-surfacing G-code program│ ├── audit.ts # Machine-safety + dimensional audit of every G-code job│ ├── viewer.css # Styling for the CAD page│ └── cabinets/ # Cabinet definitions (edit / add your own)│ ├── upper18.ts # CNC face-frame upper (48×48 boards)│ └── upper18saw.ts # Circular-saw build of the same cabinet (4×8 sheets)├── public/│ ├── images/ # Processed images (managed by Studio)│ ├── screenshot.jpg # Featured image for OG / template galleries│ └── _headers # Cloudflare header rules (copied into dist/ on build)├── _data/│ └── _studio.json # Studio media metadata — generated, never edit by hand├── index.html # SEO-rich HTML shell (meta, Open Graph, Twitter cards)├── vite.config.ts # Vite configuration (multi-page: index.html + cad/index.html)├── wrangler.jsonc # Cloudflare Worker manifest (serves dist/ as static assets)├── tsconfig.json # TypeScript config (strict)├── tailwind.config.js # Tailwind CSS configuration├── postcss.config.js # PostCSS (Tailwind + Autoprefixer)├── package.json└── README.md
Available Scripts
Development
npm run dev— Start development server at http://localhost:5173 with hot reload (Floor Plan at/, Cabinet CAD at/cad/)npm run build— Type-check, then bundle both pages todist/for productionnpm run preview— Serve the production build locally for testingnpm run typecheck— TypeScript type checking without emittingnpm run audit:gcode— Machine-safety + dimensional audit of every generated CNC G-code job
Cloudflare Deployment
Your AI assistant runs these for you — see Deploy to Cloudflare Workers.
npm run cf:build— Build both pages intodist/(same asnpm run build)npm run cf:preview— Build, then run the real Workers runtime locallynpm run cf:deploy— Build and deploy to Cloudflarenpm run cf:upload— Build and upload a version without making it live
Technologies
Frontend (Runtime)
Every dependency is battle-tested in production and chosen for stability, performance, and long-term maintainability.
- React
18.3— UI library powering both view shells - Three.js
0.169— WebGL 3D renderer - @react-three/fiber
8.17— React renderer for Three.js - @react-three/drei
9.114— Helpers for fiber (OrbitControls, Grid, Html, Edges) - Zustand
5.0— Minimal state management withlocalStoragepersistence - Zod
3.23— Runtime schema validation for the scene contract
Build & Tooling
Tools for building and developing the planner:
- Vite
5.4— Dev server and bundler with instant HMR - @vitejs/plugin-react
4.3— React Fast Refresh + JSX transform - TypeScript
5.6— Type safety and IntelliSense (strict mode) - Tailwind CSS
3.4— Utility-first styling for UI chrome - PostCSS
8.4+ Autoprefixer10.4— CSS processing pipeline - Wrangler
4.115— Cloudflare CLI, used by thecf:*scripts
Support & Community
- Documentation: gallop.software
- Issues: GitHub Issues
- Discord: Join Community
- Slack: Join Community
- Professional Services: Web Plant Media, LLC
License
MIT License — see LICENSE for details
Credits
Contributors:
Built with ❤️ by the team at Gallop